With the introduction out of the way, I'll be showing the progress I've made with my newest SD.
In the last post, I said I wouldn't use any stickers. But the eyes aren't sculpted on the face. So the sticker for the eyes is really the only option, right? Wrong! First I pressed the sticker onto the face as much as I could. Then I cut the eyes out of the sticker with my knife, using the rest as an outline.
From there I colored the exposed areas with my metallic-green Gundam Marker before removing the rest of the sticker. Though the result was pretty messy, the knife had cut deep enough to create the outline for the eyes. So after hand brushing the surrounding areas black, the eyes were done like a dinner (anyone else ever heard that phrase?).
Next I started painting the other parts to match pics of the finished product. In order to paint colored plastic in a lighter color, I added layer after layer of white as a base coat. Next time, I should buy a jar of surfacer (liquid primer) for this sort of thing.
Here's what I've done up till now. That shiny piece in the middle is the bottom half of the Core Lander jet that latches onto G Gundam's back, which I painted gray. If I really put in the time, I should be done painting and panel lining by the next post. Until then, you've never heard the phrase "done like a dinner?" Seriously?
Wednesday, September 28, 2011
Tuesday, September 27, 2011
WIP: SD G-Gundam (Intro)
In my last post, I've bought 2 Gunpla kits to tie me over during my hiatus from my Leo IV project. They would also be the second and third Gunpla in the God Gundam model kit collection I'm planning.
If you didn't know already, it started with the SD G Gundam (as it's often been called), released way back in 2002 and sold for 600 Japanese yen. The third completed model in my collection (and the first that I fully painted), it was also the first--and still the best--SD kit in my possession. But it's not the first SD kit based on G Gundam, which is what this and the next few posts will cover.
Released in 1999 and sold for 500 yen, the original SD G Gundam was actually based on the "SD Generation" series of video games based on the Gundam franchise.
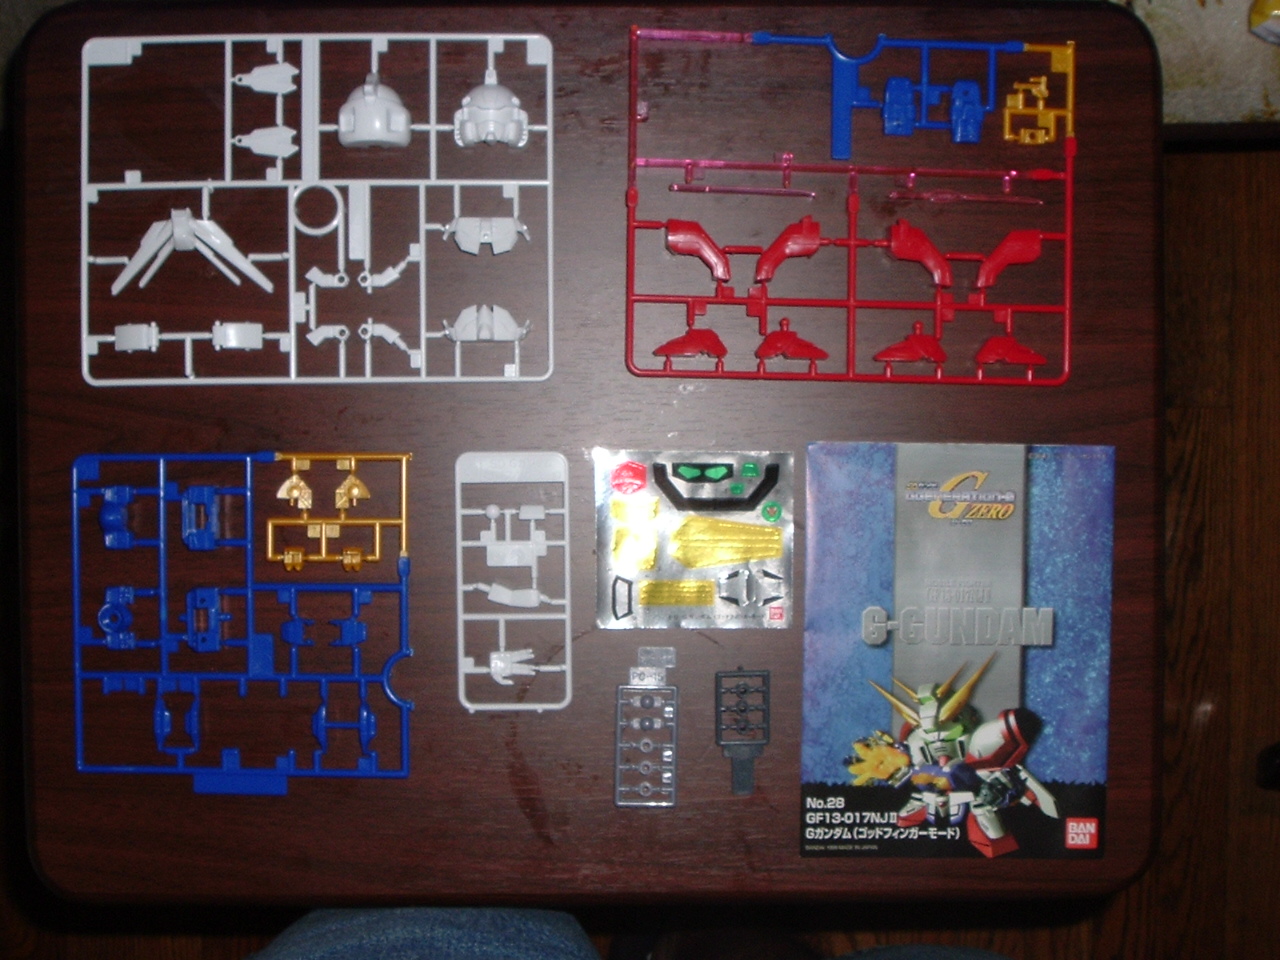
Here are all the runners, the polycaps, the stickers and the instruction booklet for the kit. Molded in 5 colors, the model itself would need a lot painting to look anything like the box art. But because this is a break from a bigger project, I'll just build the model and paint what needs painting as I go along. No, I won't be using the stickers. And no, there are no missing parts; Bandai just left those empty spaces on the runners.
Due to a series of unforeseen events, posting this WIP is taking longer than I expected. So I'll stop here. Join me next time to see how far along I am with this thing. Until then . . .
If you didn't know already, it started with the SD G Gundam (as it's often been called), released way back in 2002 and sold for 600 Japanese yen. The third completed model in my collection (and the first that I fully painted), it was also the first--and still the best--SD kit in my possession. But it's not the first SD kit based on G Gundam, which is what this and the next few posts will cover.
Released in 1999 and sold for 500 yen, the original SD G Gundam was actually based on the "SD Generation" series of video games based on the Gundam franchise.
Here are all the runners, the polycaps, the stickers and the instruction booklet for the kit. Molded in 5 colors, the model itself would need a lot painting to look anything like the box art. But because this is a break from a bigger project, I'll just build the model and paint what needs painting as I go along. No, I won't be using the stickers. And no, there are no missing parts; Bandai just left those empty spaces on the runners.
Due to a series of unforeseen events, posting this WIP is taking longer than I expected. So I'll stop here. Join me next time to see how far along I am with this thing. Until then . . .
OK, I've got nothin.'
Saturday, September 17, 2011
Guess What I Got Today!
By now you've probably realized that I've been as stagnant with my latest project as the Earth Federation during a war (Gundam joke). This realization takes me back to my freshman year in high school. In my English class, we would write something, anything in our notebook for a few minutes before the day's class was officially in session. Whenever we started something we couldn't finish, the teacher encouraged us to start something else, as long as we kept on writin.'
In pretty much the same fashion, whenever Gunpla builders are stuck on something, they usually have another model or two lying around so they could work on a new project until they're ready to finish the old one. I usually avoid this method for two reasons: First, I didn't like spending money on anything that could wind up collecting dust under my bed and second, I didn't have the money to begin with. Once I did, however, I decided to buy at least two models to tie me over. But which would I get?
For a while I've noticed that whenever someone has a favorite mobile suit, they build every model based off it. Prime92, for example, is crazy about Gundam Exia:
And 2Old4Toys is just mad about the original RX-78-2:
For me, it was quite simple:
Though I've already built the second version of the SD God Gundam, I'll start with its older counterpart (Left). Then I'll work on the 1/144 NG version (Right) before moving on to the HG version. From there, I just might buy and build every model based on God Gundam (except maybe the MG Hyper Mode version and the MG kit with the clear leg cause they're basically the same).
If I do go through with this, it'll be on top of all the other Gunpla projects I've already planned. For now, stayed tuned for my first WIP post on the SD G Gundam. Until then, I best get started.
In pretty much the same fashion, whenever Gunpla builders are stuck on something, they usually have another model or two lying around so they could work on a new project until they're ready to finish the old one. I usually avoid this method for two reasons: First, I didn't like spending money on anything that could wind up collecting dust under my bed and second, I didn't have the money to begin with. Once I did, however, I decided to buy at least two models to tie me over. But which would I get?
For a while I've noticed that whenever someone has a favorite mobile suit, they build every model based off it. Prime92, for example, is crazy about Gundam Exia:
And 2Old4Toys is just mad about the original RX-78-2:
For me, it was quite simple:
Though I've already built the second version of the SD God Gundam, I'll start with its older counterpart (Left). Then I'll work on the 1/144 NG version (Right) before moving on to the HG version. From there, I just might buy and build every model based on God Gundam (except maybe the MG Hyper Mode version and the MG kit with the clear leg cause they're basically the same).
If I do go through with this, it'll be on top of all the other Gunpla projects I've already planned. For now, stayed tuned for my first WIP post on the SD G Gundam. Until then, I best get started.
Monday, September 5, 2011
Good Site, Long Address
Having trouble typing in the incredibly long web address to my blog? Then strain your fingers no longer! To ease your suffering, I've tweaked my address to:
http://gslayer1.blogspot.com
So I ask that all those who follow GKNK to take notice and spread the word. I'll also be adding a Facebook page soon.
Until next time, I'm having a late lunch.
http://gslayer1.blogspot.com
So I ask that all those who follow GKNK to take notice and spread the word. I'll also be adding a Facebook page soon.
Until next time, I'm having a late lunch.
Sunday, August 28, 2011
Me, Myself & Irene
Over the past 2 weeks, I've taken time off from my Leo IV project to reconsider what more I wanna do and what I could do differently (though most of that time was squandered on my anime/movie/AMV addiction). This weekend was spent in preparation for Hurricane Irene; buying supplies, stuffing my windows with shopping bags and gathering plastic containers when the windows leaked the ugliest looking water I've ever seen. After a heavy rainstorm, the damage was little more than light water stains. Now that I suddenly have even more time on my hands, I'll continue working on Type IV and I hope to finish the torso sometime this year.
Looking at this pic, I have a pretty good idea of how I want to complete Leo's upper body. Once the waist area and the headcrest are taken care of, I'll glue both halves of the torso together but keep the seam line running down the sides (Center). Next I'll drill 4 tiny holes in each corner of the back to accommodate metal pins (Left). And finally I'll scribe panel lines like those shown here. But for now . . .
I have to clean up the waist area after just sawing off the excess plastic. That pink area on the left part is a dry piece of Tamiya putty that will be used to help sculpt the waist and fill in areas that are cut too deep. I had this putty since '06, so I was gonna throw it away when I bought a new tube. But then I discovered that I can still use the old putty as a sort of modeling clay.
Here's Leo's chest squeezed onto Tallgeese's torso. As you can see, the chest doesn't go all the way in, stressing the need for further modification. I thought about drilling into the chest to fit the peg on the torso, but now I'm thinking of just trimming down the peg itself, though I'd still have to work on that waist.
I have more ideas, but I don't wanna drag this out anymore. Stay tuned for my next official WIP post and other news. Until next time, break's over. Back to work!
Looking at this pic, I have a pretty good idea of how I want to complete Leo's upper body. Once the waist area and the headcrest are taken care of, I'll glue both halves of the torso together but keep the seam line running down the sides (Center). Next I'll drill 4 tiny holes in each corner of the back to accommodate metal pins (Left). And finally I'll scribe panel lines like those shown here. But for now . . .
I have to clean up the waist area after just sawing off the excess plastic. That pink area on the left part is a dry piece of Tamiya putty that will be used to help sculpt the waist and fill in areas that are cut too deep. I had this putty since '06, so I was gonna throw it away when I bought a new tube. But then I discovered that I can still use the old putty as a sort of modeling clay.
Here's Leo's chest squeezed onto Tallgeese's torso. As you can see, the chest doesn't go all the way in, stressing the need for further modification. I thought about drilling into the chest to fit the peg on the torso, but now I'm thinking of just trimming down the peg itself, though I'd still have to work on that waist.
I have more ideas, but I don't wanna drag this out anymore. Stay tuned for my next official WIP post and other news. Until next time, break's over. Back to work!
Sunday, August 14, 2011
WIP: 1/144 NG Leo Type IV Custom (Part 2)
Welcome back! This weekend, I intended to finish sawing Leo's skirt armor off its torso. Until I was up to it, however, I decided to work on the other parts I'd be using for Type IV; in this case, the arms from the Tallgeese kit.
These are the parts that make up each arm (excluding the polycap hands). The parts for the shoulder armor (Top) would overlap the shoulder (Center) which would attach to the forearm (Bottom) with a polycap joint. But if I fully assembled the shoulder first, removing its seam lines and painting it would be a problem. So . . .
Starting with the shoulder and forearm, I trimmed the pegs and attached the polycaps (Circled) to each before applying liberal amounts of plastic cement (Top) to the rims of each part. Here I learned that for old kits like Tallgeese, it's a good idea to trim the pegs of all the parts and make sure they fit together; otherwise you're stuck with large gaps in between. It's also important to stick in those polycaps BEFORE using the cement, because once that cement sets, you can't go back and fix mistakes.
Once the cement was added, I squeezed the glued parts together so that excess cement would seep out. So that I wouldn't be squeezing parts between my fingers for the next few hours, I used plastic clamps I got from the dollar store. They're cheap, but they do the job right.
Because my camera didn't get it, the red line indicates where both parts for the shoulders are permanently welded together, erasing the seam line. I'll eventually smooth it out with sandpaper (BTW, I'm holding up this part with a stick).
Next I modifed the shoulder armor by taking my knife and creating a channel in the holes connecting to the other pegs of the shoulder. Once they're painted . . .
These are the parts that make up each arm (excluding the polycap hands). The parts for the shoulder armor (Top) would overlap the shoulder (Center) which would attach to the forearm (Bottom) with a polycap joint. But if I fully assembled the shoulder first, removing its seam lines and painting it would be a problem. So . . .
Starting with the shoulder and forearm, I trimmed the pegs and attached the polycaps (Circled) to each before applying liberal amounts of plastic cement (Top) to the rims of each part. Here I learned that for old kits like Tallgeese, it's a good idea to trim the pegs of all the parts and make sure they fit together; otherwise you're stuck with large gaps in between. It's also important to stick in those polycaps BEFORE using the cement, because once that cement sets, you can't go back and fix mistakes.
Once the cement was added, I squeezed the glued parts together so that excess cement would seep out. So that I wouldn't be squeezing parts between my fingers for the next few hours, I used plastic clamps I got from the dollar store. They're cheap, but they do the job right.
Because my camera didn't get it, the red line indicates where both parts for the shoulders are permanently welded together, erasing the seam line. I'll eventually smooth it out with sandpaper (BTW, I'm holding up this part with a stick).
Next I modifed the shoulder armor by taking my knife and creating a channel in the holes connecting to the other pegs of the shoulder. Once they're painted . . .
I can slide the shoulder into the armor . . .
And it doesn't fall off. This could be a problem once the weapons and rear verniers are attached, but that's a worry for another day.
Before gluing the armor together, I've decided to shave some of it off to better resemble Leo's. After breaking out my hobby saw and cutting along the lines I drew . . .
I sanded the rough areas and voila!
I know this photo's dark and fuzzy, but you get the idea. Leave a comment or two and let me know what you think so far. Until next time, it's off to the movies, again!
Monday, August 8, 2011
WIP: 1/144 NG Leo Type IV Custom (Part 1)
I'm a bad blogger. There, I said it.
I've finally started my Leo/Tallgeese mashup project last week, but this update's been postponed by unforeseen circumstances as well as my own stagnation. It's not just that I've grown used to planning my project instead of actually getting it off the ground, but that the tasks involved are easier said than done. Here's what I mean.
Starting with Leo, I took the back half of the torso and trimmed the pegs with my knife. That way, when I test-build parts it's easier to separate them.
Next, going by the pic of Leo Type IV, I cut a hole in the back of Leo's head (Left) and drilled another hole behind the front of the head (Right) in order to insert Tallgeese's headcrest (Above). However, the drill I used was too small AND the hole's close enough to open up on the other end.
My next idea was to combine Leo and Tallgeese's torsos to provide waist movement for the finished product. I would start by cutting Leo's skirt armor off its torso, keeping my tools steady with either pegs (Left) or Dymo label tape (Right), the latter of which doesn't work too well in this case . . .
. . . As you can see with the part on the left. I remind the reader that Limited Model kits like Leo are much thicker than regular Gunpla; even my new dual-bladed hobby saw (Below) can barely cut it (pardon the pun). Fortunately, I've also got a new tube of putty (Top) for [much needed] repairs.
That's it for Part 1. Join me for "Part 1 1/2," when I continue to saw Leo's skirts off. Will I finish the job by this weekend? Will I be able to post new blogs on a weekly basis? Will I ever find the perfect push drill? Find out in the next exciting entry in the Gunpla Kit n' Kaboodle! Until next time, are you building Gunpla yet?
I've finally started my Leo/Tallgeese mashup project last week, but this update's been postponed by unforeseen circumstances as well as my own stagnation. It's not just that I've grown used to planning my project instead of actually getting it off the ground, but that the tasks involved are easier said than done. Here's what I mean.
Starting with Leo, I took the back half of the torso and trimmed the pegs with my knife. That way, when I test-build parts it's easier to separate them.
Next, going by the pic of Leo Type IV, I cut a hole in the back of Leo's head (Left) and drilled another hole behind the front of the head (Right) in order to insert Tallgeese's headcrest (Above). However, the drill I used was too small AND the hole's close enough to open up on the other end.
My next idea was to combine Leo and Tallgeese's torsos to provide waist movement for the finished product. I would start by cutting Leo's skirt armor off its torso, keeping my tools steady with either pegs (Left) or Dymo label tape (Right), the latter of which doesn't work too well in this case . . .
. . . As you can see with the part on the left. I remind the reader that Limited Model kits like Leo are much thicker than regular Gunpla; even my new dual-bladed hobby saw (Below) can barely cut it (pardon the pun). Fortunately, I've also got a new tube of putty (Top) for [much needed] repairs.
That's it for Part 1. Join me for "Part 1 1/2," when I continue to saw Leo's skirts off. Will I finish the job by this weekend? Will I be able to post new blogs on a weekly basis? Will I ever find the perfect push drill? Find out in the next exciting entry in the Gunpla Kit n' Kaboodle! Until next time, are you building Gunpla yet?
Subscribe to:
Posts (Atom)