Wednesday, February 26, 2014

Review: 1/144 NG Zoloat


General/Technical Data

Series: No Grade 1/144
Title: ZM-S06S Zoloat
Release Date: 05/1993
Suggested Price: ¥500 ($7)
No. of Parts: 50 + Polycaps + Foil Stickers
Plastic Colors: Red, Yellow, Transluscent Purple
Gimmicks: Beam Rifle, Beam Sabers (2), Beam Shield, Display Base

Intro

I'm taking my sweet time, but I'm making good on my promise to churn out a few blogs on a regular basis.  And my latest attempt to return to Gunpla building has begun with yet another blast from the past.  Inspired by Mobile Suit Victory Gundam, the Zoloat offers a unique, albeit faster, method to building by molding the runners in the same shape and simply pressing them together, assembling several parts at once.  Other than that and Bandai's attempt at an inner frame composed of polycaps, it's your run-of-the-mill, generic 1/144 scale model.

Head

Basically 2 halves molded in red.  Stickers are provided for the forehead, eyes and cheek vents.

Torso


Composed of 7 parts, including a large polycap with joints placed inside the chest, the torso also sports a backpack with 2 thrusters.  4 stickers are available for the chest.


Much like the 1/144 NG G Gundam, 2 more polycaps hold all the skirt armor together, giving articulation to each individual piece (except the front and back skirt).  One sticker is available for this section.

Arms


Each made up of 9 parts--including polycap hands of which you can't tell the back from the palm--both arms can rotate 360 degrees at the elbow and bend at a 180-degree angle.  What's more . . .
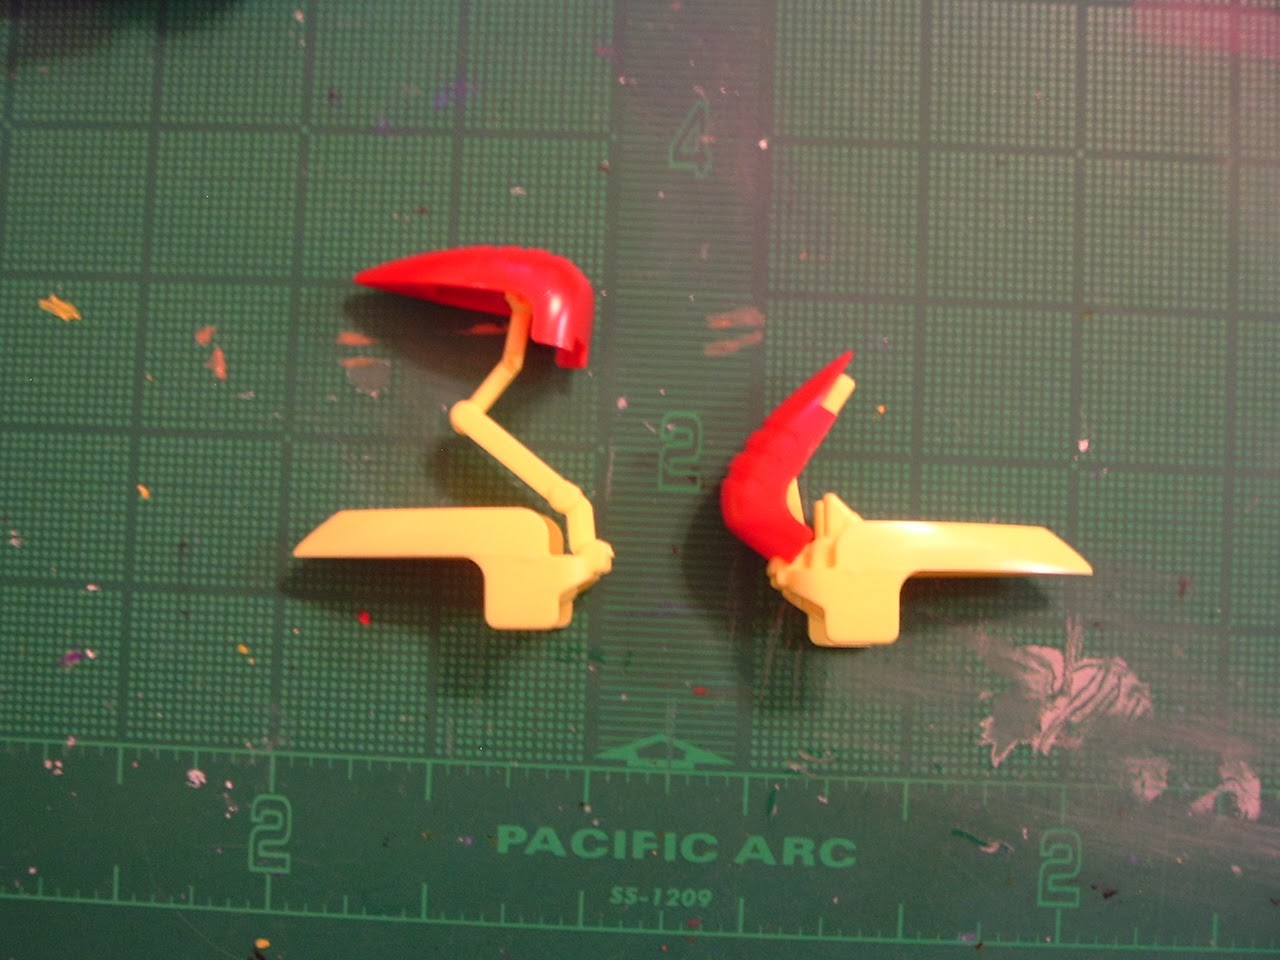

The left shoulder armor has a built-in sidearm while the right one can hold up the beam shield (though not very well; more on this one later).

Legs


Each made up of 7 parts, the legs can move at about 45 degrees at the knees and ankle.  The oddity here are two tiny pieces, each with 2 thrusters, that slide onto the back of the legs.  Apart from not being hollowed out, the thrusters just stick out too much when viewed from the back.

Weapons & Accessories


The beam rifle comes in a single piece and needs painting.  Fixed onto a runner of brittle clear-purple plastic are a straight and curved saber, the shield and a display base able to support both the model and an included postcard from the battlefield (back).  If the card was a little wider or set up sideways, perhaps it would've worked.  As for the shield (right), it goes through a peg under the shoulder armor and held in place (albeit, not very well) with a separate piece.

Conclusion

I reiterate, the Zoloat is your run-of-the-mill, generic Gunpla kit with sub-par articulation and a few interesting gimmicks, but nothing special.  You gotta like how they threw in a free display stand, though.


Overall Rating: 3 Out of 5.

Monday, February 10, 2014

Project V (Part 1)

If I learned anything from these past few days is that if something's important to you, you make time for it.  With that said, I really want to see this Gunpla project through to the end, though it'll still take time considering all the other hobbies I've fallen behind on (I'm still reading The Girl Who Played with Fire after a year!).  I'm already looking up how I can spruce up my 2 Victory Gundam mechs.  But for now, let's prepare for when they're eventually painted.


I started with the Zoloat, my favorite of the two.  I took my own sponge (cuz using the one from the kitchen sink would be gross) along with some dishwasher soap and gave the runners a good rubdown.  Then I rinsed out the parts with water and laid them out to dry.


I've tried to do the same for some plastic cards and signs I've saved up so that I can customize the Gunpla with the bits and pieces.  But the only thing I have that can strip the ink and printing is a bottle of nail polish remover.  Up till now I've avoided using it cuz the acetone it contains can melt plastic, but I'm already working with limited resources.  So I tried it and so far the results are mixed.


Remember when I mentioned the V Gundam models have their own unique method of assembly?  Course you don't.  Notice how these 2 runners share the same shape and their parts seem symmetric to each other?  Actually one big runner, I've split it in 2, intending to press both halves together via the instructions.  But before going that far . . .


I cut out the soft plastic polycap with ball joints connecting both the head and arms and stick it in one half of the torso . . .


And then pressed both runners together, assembling the head, torso, shins at the same time.  Took some work to separate 'em from the runner, though.


I moved on to construct the rest of the torso, and the backpack (not pictured).


Along with the shoulder armor . . .


And the arms . . .


And the legs . . .


And we're done.  The last 2 pics show the Zoloat with its arsenal and perched on its display base.  Behind it is that scenic trading card with a base of its own.  Not the best concept Bandai ever dreamt up, but at least the model itself gets its very own base.


 And now I move on the Javelin, following all the procedures I've set up for the Zoloat.


Here's a shot of Javelin's backpack, which holsters a pair of missile-like weapons called Shot Lancers.  I almost forgot to add a handle for Javelin to grab onto the Lancers for added acceleration.  Skip the next few steps . . .


And we're done.


Though they seem to hold up better than most of my other NG's, I've still got my nitpicks, which will be covered in my reviews.  Also look out for my next entry for this project.  Until next time, I'm saving up for a can of Purple Power.

Wednesday, February 5, 2014

Project V (Intro)


Project V: A name fitting for my first Gunpla project for this new year.


On top of the other kits I've started but never finished, I've taken out these two on a binge brought on by repeat views of Gundam Build Fighters.  I guess now's a good a time as any to formally introduce the 1/144th scale ZM-S06S Zoloat (Left) and RGM-122 Javelin (Right) from the Mobile Suit Victory Gundam animated series.  Both models were released in 1993 and each sell for 500 Japanese yen ($3.94 US).  They are Numbers 5 and 6 in this Gunpla set, respectively.

Let's check out the Zoloat first:


Straight out of the box, most of the parts are separated by color.  Under the bags is a foldout instruction manual and a card with a space scene on the front and mech info on the back.  The card will come into play later.


Now that the bags are open, we have a better view of the Zoloat's parts.  On the lower right we see both clear-purple parts for beam weaponry and an included display base, and also polycaps that connect the limbs, similar in design to the 1/144 NG G Gundam.


Though constructed the same way as the Zoloat, the Javelin appears to have a few more pieces; understandable since the mobile suit itself has a bigger armament.


Almost forgot to mention that this optional weapons set will also be used in this project.  Same year of release, same price and it's Number 14 in the V series.  Here's a preview of the parts and stickers that we'll see when the time comes:


That's all for now.  Next time I'll get around to test-building these new Gunpla.  Until then, catch the new Gundam series Gundam Build Fighters on GundamInfo's channel on YouTube.

Monday, September 16, 2013

Don't Call It a Comeback

Due to ongoing financial woes and situations that have kept my family at home 24/7, I meant to announce an official hiatus from my blog in March.  And I'm almost embarrassed to say that I couldn't even do that in a timely manner.  Having sold most of my Gundam collection and taking a frustrating part-time job to cover both a mounting debt and living arrangements, I can still buy supplies bit by bit, but when will I ever use them?

In the meantime, I'm frantically searching for full-time work to solve my cashflow problems and eventually restart all my projects.  I've also been looking at all the HG kits coming out, including those from the upcoming TV series Gundam Build Fighters, and I hope to get one for a straight build to get back into the swing of things.  And somehow I've managed to stock up on some old toys from Gundam's Superior Defender line, so I just might review those in the near future.  Plus, you can still check my Facebook page for random snippets and updates.

So until next time, I've really gotta get over this cold.

Wednesday, November 14, 2012

Guess What! (9)

Due to unforeseen circumstances, I've spent the time between my last post and this one selling my stuff online for some much-needed money.  And by 'my stuff', I mean most of my Gundam merchandise--including my unbuilt Mobile Flat, Jenice and 7-Eleven Zaku models.  However, as I reluctantly thinned out my collection, I found myself expanding it at the same time.


To get rid of the paint that rubbing alcohol and scrubbing couldn't get out, I crammed a bunch of parts from my Heavyarms Custom into a jar of enamel thinner and let 'em soak for a day.  Not only did the thinner turn blue, but the parts became soft and brittle.  Looking back, I should've dipped a piece of Epyon first, which I'll be doing from now on.


Having already gone against my philosophy of not buying Gunpla I've haven't built myself, I bought another Heavyarms to take the parts I need.  While I was at it . . .


I bought another 1/144 Tallgeese to gather parts for my Leo Type IV, and wound up with a Wing Gundam and an Altron.  All 3 were released in 1995 and each sold at retail for 500 yen.


The models retain most of their parts.  Epyon's wings and a shield from a Gundam action figure were added for some reason.  I only need Tallgeese, but now that I've got Wing and Altron I'll fix 'em up the way I'm fixin' up Heavyarms and Sandrock.  You'll see either that or Leo IV in my next post.

Until then, I'm rewatching G Gundam; forgot whether the Shining Finger is Domon's only special move.

Wednesday, September 5, 2012

The Heavyarms/Sandrock Doubleheader (Intro)


In this long-overdue posting, I formally announce yet another stagnant project of mine: The restoration and painting of a pre-built 1/144-scale HG Gundam Heavyarms Custom and Gundam Sandrock Custom from the OVA Endless Waltz.  Both kits will also serve as testbeds for modeling techniques I haven't tried yet.


In case you missed it, I acquired these and 2 other completed kits in this box at a swap meet some time ago. Released in 1998, Heavyarms and Sandrock were Numbers 3 and 4 in the "HG Fighting Action" series and originally sold for 800 Japanese yen.


The models released in the U.S. included both the original Japanese and English instructions.  Still don't get why you'd need both.


A front shot of both Gundams.  Typically, parts from both kits were snipped off their runners and the resulting nubs were left unattended.  The included stickers were applied and the rest was colored carefully with canvas paint.  Dark patches were added to Sandrock's legs, no doubt to mimic the shading in the photos on the instructions.


A rear view of the Gundams.  Heavyarms comes complete with all its accessories, including open/closed missile bays and pairs of closed-fist, trigger-finger, and open-palm polycap hands; a refreshing step-up from the original 1/144-scale models.  Sandrock also has polycap hands and 2 plastic hands grasping the hilts of its heat shotels, a variant chest for crotching poses, a shield to combine the shotels for the "Cross Crusher" attack, and a single hilt for the shotels.


As shown here, I've separated each and every part of both kits and given each (and all the polycaps) their own container.  I then filled said containers with rubbing alcohol and let the parts soak for a day so as to loosen the paint.  Sure enough, the paint just peeled off of Sandrock's parts.  But the paint on Heavyarms proved harder to remove, even after having to leave it for a week.  Then I dunked Heavyarms in Windex, but I'm gonna need something stronger to remove the darker paint.  Unfortunately, the acetone in the nail polish remover I tried just melted the talons off the another model from the bundle.

Another hurdle is that both heads have been glued together.  I managed to yank off half of Sandrock's head, but everything else's stuck on the other half.  Once again I'll have to wait till next weekend to try and sort it all out.  Until then, I've really gotta plan things better.

Sunday, July 22, 2012

Guess What! (8)

Realizing that my online purchases have gone up while my funds have gone down over the past few months, I've made it a goal to save as much money as possible.  But just the other day, I walked past this guy's daily garage sale, seeing nothing in particular--except this:


It wasn't until today that I was able to make a little withdraw and get this for just $5.  I checked the box beforehand expecting just a built 1/144 High Grade Heavyarms Custom or a semi-complete kit with missing parts and runners, but instead . . .


I get a complete Heavyarms, a No Grade Epyon of the same scale, a Vayate, a Sandrock Custom, . . .


Assorted parts and weapons (and runner scraps) from all the kits, . . .


And instructions for Heavyarms in Japanese and English (Like anyone really needed both).


The previous owner went over Epyon and Heavyarms with stickers and canvas paint, of all things, but failed to follow through with Vayate and Sandrock.  Plus I could see all the spots where the parts were snipped off the runners.  I definitely see myself restoring all these models except Epyon, which is a loose, disproportionate mess I'll likely harvest for spare parts.  And it just so happens that I wanted spare parts for my Leo IV.  This marks the end of the latest edition of Guess What!.  Until next time, I'm still digesting the Chinese-style fried chicken I had for lunch.