Tuesday, June 28, 2011

WIP: 1/144 LM Leo Custom--Part 3

If you looked up pics of this kit online, you'd find at least 3 of the Leo in some variant of its standard green color.  Since, of course, it's been done, I've decided on painting my Leo in its East Asian forces colors.


I wanted the paint to be as close to this as possible.


Going by what others have said online, I mixed Tamiya Royal Blue with White and rubbing alcohol (above).  After mixing different ratios of both colors, something was still missing (and my camera's flash makes everything brighter).  So I added some purple and once I was satisfied with the results . . .


I poured the new paint into an old, empty jar of thinner.


Once I colored most of the Leo with the new paint, I used Tamiya Purple, Chrome Silver, Clear Yellow, German Gray, Black and Testors Gray on the rest.

You're now officially up to speed.  The next few phases of completing the Leo will take a while.  In the meantime, let me know what you think so far.  My next entry will cover panel lining and adding a topcoat.  Until then, ride the big one.

Monday, June 27, 2011

WIP: 1/144 LM Leo Custom--Part 2

Welcome back.  For those who are just joining us, this WIP focuses on a limited edition model kit of a mass-production robot (which I'll refer to by the Gundam term mobile suit from now on), the 1/144 LM Leo Custom from Gundam Wing.  For this entry I'll talk about preparing the model for painting.

Though I've decided on a custom color scheme well ahead of time, the model's olive-green plastic was darker than the intended color and would've required at least several applications of paint to get the right tone.  To avoid that I would first add primer, an undercoat that helps paint to stick to a surface and keep its tone with fewer applications.  Primer is available in white for light colors and gray for dark colors, though you can paint a light surface in a dark color without it.


Pictured above is the only can of Testors brand primer (gray) available at my local arts-and-crafts shop.


At first, the primer worked well enough when I tried it on spare spare plastic.  But when I sprayed it on parts of the model itself (above), it took an eternity to dry.


Even when placed in front of a heater!

Fortunately, the primer is easily removed with a lacquer-based thinner.  So it's back to the drawing board.


When the anime/hobby shop closest to my area stopped selling primer, I went and bought the cheap stuff from the nearest hardware store.  Though not intended for model kits, Krylon brand products have quite a reputation as substitute hobby supplies.  This can of primer costs half as much as modeling primer, carries twice as much liquid and works just as well.  The downside is that this primer leaves a rough finish that needs sanding; can cover up sculpted lines if sprayed too close; and leaves behind a lot of fine dust.  Of course, I've taken the necessary precautions when using this product.


Now I should point out that primer also exposes errors made in the removal of seam lines.  You fill in the seams with putty, sand the surface and add primer until the seams are gone (something I couldn't do with the Testors primer).  In the end, all things considered, I'd say the experiment was a success.


Look, it's a pic of the prototype 1/144 HG Leo, to be released in time for Gundam's 40th anniversary!

Rear View

Join me next time when I show off pics of the actual painting process.  Until then, say your prayers and take your vitamins.

Sunday, June 26, 2011

WIP: 1/144 LM Leo Custom--Part 1

I meant to do these work-in-progress entries (and finish my latest Gunpla project) much sooner.  But having only 2 days a week to myself--and me not always taking advantage of that precious time--my project's been dragging along for weeks.  But I've been taking photos of the Gunpla in almost every stage of the modeling process, and I pretty much recall each step.  So let's get crackin!'

I'm currently working on the 1/144th scale OZ-06MS Leo Custom (Gundam Wing) from the "Limited Model" (LM) series from Bandai, manufacturer of all things Gunpla.  Released in 1996, the LM line covered several anime shows and produced 6 Gundam kits, the Leo being the 4th kit on that list and the 15th in the whole series.    It originally sold for ¥ 800 ($10), but has now become more expensive and harder to come by.  I'm building one of 2 Leos I was lucky to snipe off eBay, the other being saved for my next project.

Front of Box

Back of Box

(From top left to bottom left) runner with arms and torso, runner with legs and weapon, instruction booklet, polycap joints, and water-slide decals.

As you can see, the kit is molded in one color, so painting's a must.  The polycap joints are the same ones used for 1/144 NG kits.  The difference is that the Leo's parts are thicker and heavier than of those other kits.


When you put 2 symmetrical parts together, you see a thin seam line from where both parts connect.  For your painted Gunpla to look its best, it's recommended that you remove that line.  You can fill it in with either plastic cement (Left), or with modeling putty (Right).  In this case, I used both to cover every inch before smoothing out the surface with sandpaper.  I also had to scrape off mold lines of excess plastic from several parts.


If you watched Gundam Wing, and you had a good eye, you'd notice that the Leo had 4 bolts on each kneecap.  Since this Leo has no bolts, I decided to improvise.  Cutting tiny bits from the polycap runner, I glued them on both kneecaps (Above).  And if you closely at the leg, you'll notice the areas where the seam lines used to be.

The next few pics show the complete, unpainted Leo:

Front View

Side View

Rear View

Action Pose

That's all for today.  Next time I'll show you how I prepared the Leo for painting.  Until then, good night and Godspeed.

Thursday, June 23, 2011

Gunpla: A Guide

Welcome to the show.  Today's guest is none other than myself (again), and I'll be talking about the different varieties of Gunpla available for your consumption.  And believe me, there are tons of varieties out there.  From cups of instant noodles with a "toy surprise" to 5-foot-tall robots minding the fence at shopping malls.  You've got Gunpla that can transform and combine with one another, and others that shoot their own heads instead of missiles.  And there are even Gundam models that have all the articulation of an action figure in a single finger.  So you'd be most mistaken in saying a Gundam kit is a Gundam kit.  To save you the torment of an endless online search, this guide will only cover the types of Gunpla you're most likely to find.

Scale

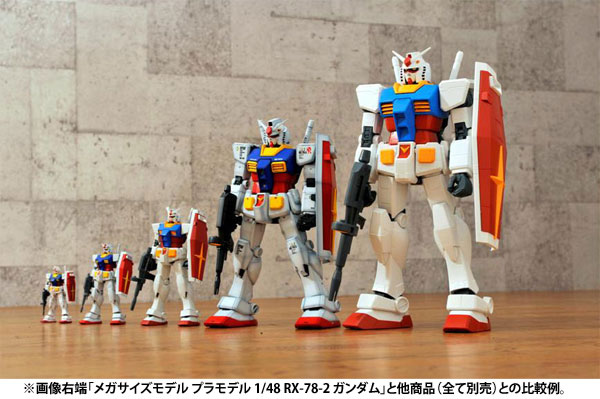
The RX-78-2 Gundam in various scales

A popular question among beginners is how to measure Gunpla by their scale, a ratio that determines the size of the finished product representing the 'real' thing.  First, look up your robot's fictional specs, preferably at Gundam Official or MAHQ.  They will include your robot's overall height in meters.  Then you convert the height to centimeters, multiply it by the model's scale, and convert the estimate to inches if desired.   For example the height of the original RX-78-2 Gundam is 18.5 meters, or 1850 centimeters.  If you find, say, a 1/144th scale model of the Gundam, then:

1850cm * 1/144 = 12.8cm, or 5 inches

If you know your robot's height--and your math--you can estimate the size of a completed model before you even open the box.  Just to make life a little easier, here are the 3 most popular scales for Gunpla:

1/144 - Roughly 5-6 inches tall
1/100 - Roughly 7-8 inches tall
1/60 - About 12 inches tall

Now we'll discuss the different levels of quality of Gunpla.  Basically, the more money you spend, the bigger your completed kit will be, and the more color-molded parts, articulation, details and features it'll have.  Another factor in determining the quality of Gunpla is age; some of the newest kits have significant improvements over the ones your probably saw at Toys"R"Us years back.  Also note that the prices listed here are only estimates.  Kits can cost more depending on their availability and where you shop.

Super Deformed (SD)

SD God Gundam

Measuring 3 1/2 inches tall, SD kits are stubby, big-headed caricatures of various Gundam robots.  Having large parts molded in 4-5 colors, they include stickers for accuracy.  SD kits include the gimmicks of their bigger counterparts, as well as extras like snap-on armor and spring-loaded missile launchers.  Once having less than 8 points of articulation, SD's now have swiveling waists and ball-jointed legs for more poses.  "Musha Gundams," SD's with samurai armor and gimmicks, are also available.  SD's go for 400-1,400 Japanese yen ($5-$18 USD).

First Grade (FG) 1/144

1/144 FG Gundam Exia Rollout Colors

A more affordable way to get your feet wet in Gunpla, the parts are removed from their runners by hand.  The first FG's were reissued versions of the first model kits inspired by Mobile Suit Gundam.  They have about 9 points of articulation and are well-proportioned but are also molded in one color.  The FG's inspired by the Gundam 00 series, however, are molded in 4 colors and have joints made from soft ABS plastic.  FG's are priced at 300-500 yen ($3-$6 USD).

"No Grade (NG)" 1/144

1/144 Gundam Double X

Referred to as such by fans for lack of any classification, these kits are molded in 4-5 colors, include stickers and need minimal painting for color accuracy.  They bear about 16 points in articulation and their estimated price is 500-700 yen ($6-$10 USD).

High Grade (HG) 1/144

1/144 HG RX-78-2 Gundam

A big step up from FG's and NG's, about 90% of an HG's parts are molded in the right colors, requiring almost no paint for accuracy.  They are also slightly more articulated than NG's.  HG's have more parts to assemble and cost more, but you wind up with a great model in a convenient size.  Though this line features robots from almost every Gundam show, most HG's represent machines from Gundam's "Universal Century (U.C.)" timeline.  They're priced at 600-2,000 yen ($8-$25 USD).

Real Grade (RG) 1/144

1/144 RG Aile Strike Gundam

The newest line of Gunpla, these kits are 99% pre-colored, are painstakingly detailed, and include an pre-assembled internal 'skeleton' providing about 40 or so points of articulation.  They even come with posable hands with holes to grab weapons.  So far, RG versions of the RX-78-2 Gundam, Char Aznable's Red Zaku II and Gundam SEED's Aile Strike Gundam are available, with the mass-produced green Zaku II on the way.  They're priced at 1,500-2,000 yen ($19-$30 USD).

No Grade 1/100

1/100 Gundam Deathscythe Hell Custom

Once classified as High Grades, these are simply bigger versions of their 1/144 counterparts, with more parts and more articulation.  Not much has changed in this line except that the newest 1/100's include battery-powered lights.  They're priced at 1,500-3,000 yen ($18-$40 USD).

Master Grade (MG) 1/100

1/00 MG Wing Gundam

The line that inspired the Real Grade brand, Master Grades maintain the same color accuracy, detail and the ability to perform a wide array of poses, though only the latest MG's have begun to fully utilize its internal frame technology.  Some limited-edition kits have clear armor that shows off the inner frame, while others have working lights.  MG's are priced at 2,800-8,000 yen ($40-$100 USD)

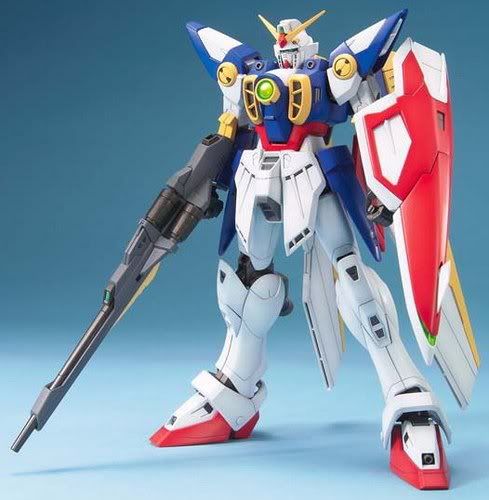
Perfect Grade (PG) 1/60
1/60 PG Wing Gundam Zero Custom

The ultimate accumulation of Gunpla technology, the 12-inch-tall Perfect Grades include perfect color molding, an inner frame for near-endless articulation, incredible detail, rub-on/water-slide decals, springs, wires, screws and light-up eyes and chest pieces.  Because these kits are heavy-duty and very expensive, I personally don't recommend them to beginning modelers.  They cost 9,600-24,000 yen ($120-$300 USD).

EX Model 1/144/U.C. Hard Graph 1/35

1/35 UCHG M61A5 Main Battle Tank

Both of these lines specialize in non-robotic vehicles from the Gundam universe and are marketed toward expert modelers.  The EX kits depict mostly air and spacecraft and are molded in one color, include snap-fit parts, and require painting.  Better suited for dioramas, Hard Graph kits add a distinct military flavor with conventional tanks and ground vehicles (and even throw in figurines).  Though they include snap-fit multicolored parts, some parts need to be glued and a full paint job does wonders.  The EX kits sell for 2,250-3,600 yen ($28-$45 USD), while the Hard Graph kits sell for 1,200-7,200 yen ($15-$90 USD).

Resin Kits

1/144 Gerbera Gundam

Resin is described as a hydrocarbon secretion of various plants.  Resin kits are made by injecting a liquefied synthetic resin into silicone rubber molds before the liquid itself hardens.  Though even amateurs can cast resin kits at little cost, it involves a lot of hands-on labor which easily jacks up the price to thousands of Japanese yen or hundreds of American dollars.  Depicting more obscure robots from Gundam, resin kits need to be cleaned, glued and painted.  And you have to fix any imperfections yourself.  Some resin kits are "conversion parts" used to complement or modify regular plastic models.  For experts only.

Show's over.  Join us next time when I (finally) get you up to speed on my latest work in progress.  Until then, GET OFF MY STAGE!!!

Special thanks to Gunjap.net for providing the last pic for this post.

Tuesday, June 21, 2011

Gunpla: An Introduction

Hello, folks.  As I continue to organize this blog little by little, you're probably asking, "What is Gunpla?"  "What is this guy talking about?"  First off, I advise you to think before you comment on the off-chance that I'm not actually a guy.  Second, while a lot of websurfers out there already know what Gunpla is, I offer this brief history lesson for the uninitiated.


It started with the animated TV show Mobile Suit Gundam airing in Japan in 1979.  A space-age war drama that treated giant robots as military weapons, the show gained poor ratings in its initial run but achieved great success in reruns.  Around the same time Gundam plastic model kits, or "Gunpla," were introduced.  As Gundam went on to spawn various TV shows, movies, videos, comics and a flood of merchandise, Gunpla would also advance and become a franchise unto itself.  Breaking into the American market in the late 90s, Gundam didn't really take off in the U.S. until Gundam Wing aired on Cartoon Network in 2000.  As Americans enjoyed more Gundam, they bought Gunpla at Toys"R"Us and other select stores.  Though it's pretty much dead in America these days, the Gundam franchise is still going strong in Japan.  If you find that hard to believe, a life-sized, 59-foot-tall replica of the iconic RX-78-2 Gundam was built to commemorate the franchise's 30th anniversary in 2009.


In case you're still asking, "What is Gunpla?," they're scale models depicting various robots and vehicles from the Gundam universe (the way scale models depict real cars and airplanes).  Featuring snap-fit plastic parts molded in color, soft plastic joints and foil stickers, you don't need glue or paint to build the model (though painting will greatly enhance its appearance).  But the best part is that the instruction manual consists of easy-to-follow diagrams, so anybody can get into it.  To give a better idea of what Gunpla's all about, here's a clip from the anime miniseries Gunpla Builders Beginning G:


This wraps up my personal introduction to Gunpla.  Next time, I'll describe the different types of Gunpla available.  Until then, I'm gonna keep working on organizing this blog!