Wednesday, November 14, 2012

Guess What! (9)

Due to unforeseen circumstances, I've spent the time between my last post and this one selling my stuff online for some much-needed money.  And by 'my stuff', I mean most of my Gundam merchandise--including my unbuilt Mobile Flat, Jenice and 7-Eleven Zaku models.  However, as I reluctantly thinned out my collection, I found myself expanding it at the same time.


To get rid of the paint that rubbing alcohol and scrubbing couldn't get out, I crammed a bunch of parts from my Heavyarms Custom into a jar of enamel thinner and let 'em soak for a day.  Not only did the thinner turn blue, but the parts became soft and brittle.  Looking back, I should've dipped a piece of Epyon first, which I'll be doing from now on.


Having already gone against my philosophy of not buying Gunpla I've haven't built myself, I bought another Heavyarms to take the parts I need.  While I was at it . . .


I bought another 1/144 Tallgeese to gather parts for my Leo Type IV, and wound up with a Wing Gundam and an Altron.  All 3 were released in 1995 and each sold at retail for 500 yen.


The models retain most of their parts.  Epyon's wings and a shield from a Gundam action figure were added for some reason.  I only need Tallgeese, but now that I've got Wing and Altron I'll fix 'em up the way I'm fixin' up Heavyarms and Sandrock.  You'll see either that or Leo IV in my next post.

Until then, I'm rewatching G Gundam; forgot whether the Shining Finger is Domon's only special move.

Wednesday, September 5, 2012

The Heavyarms/Sandrock Doubleheader (Intro)


In this long-overdue posting, I formally announce yet another stagnant project of mine: The restoration and painting of a pre-built 1/144-scale HG Gundam Heavyarms Custom and Gundam Sandrock Custom from the OVA Endless Waltz.  Both kits will also serve as testbeds for modeling techniques I haven't tried yet.


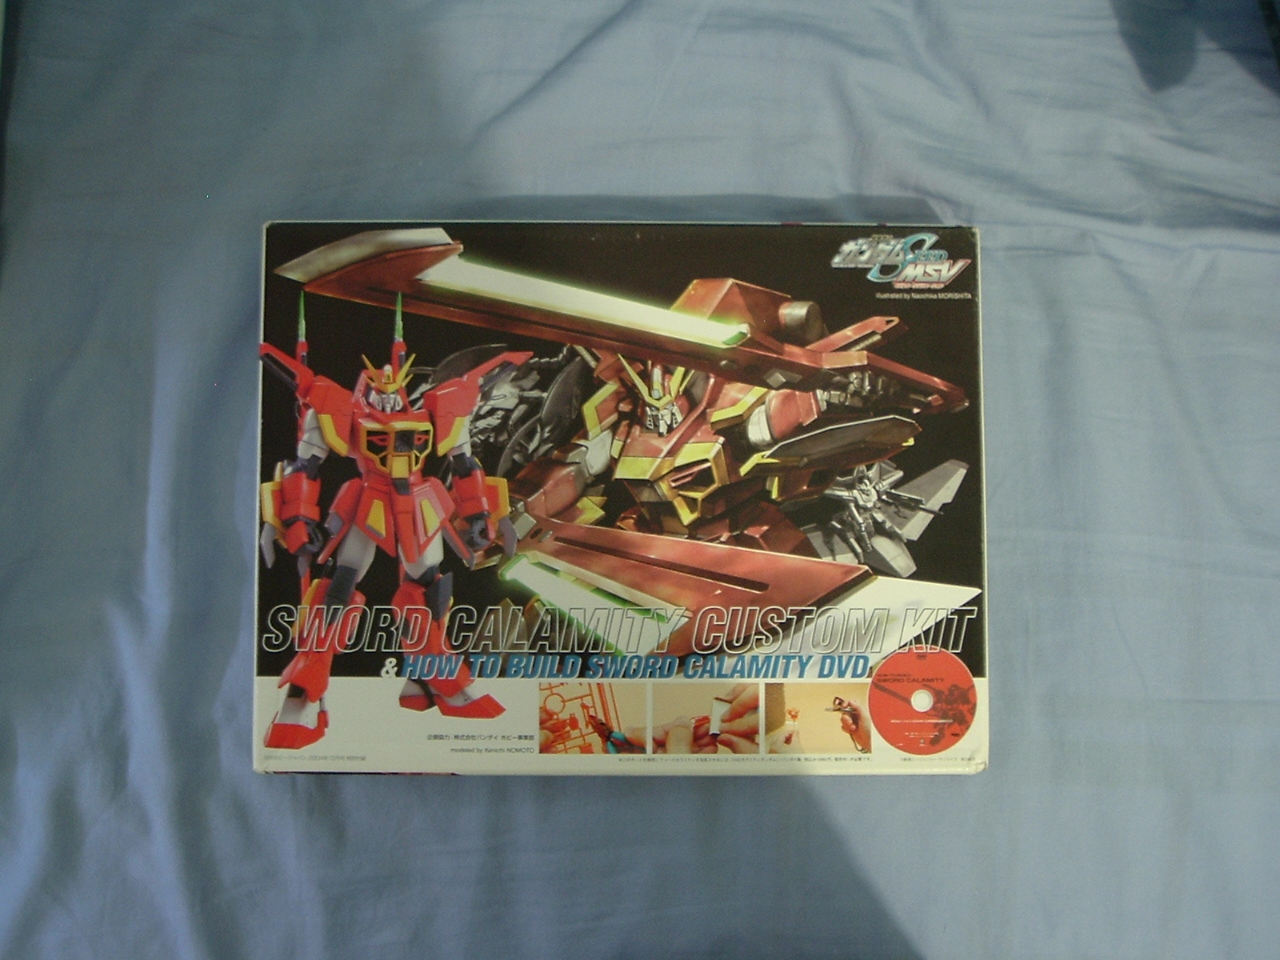
In case you missed it, I acquired these and 2 other completed kits in this box at a swap meet some time ago. Released in 1998, Heavyarms and Sandrock were Numbers 3 and 4 in the "HG Fighting Action" series and originally sold for 800 Japanese yen.


The models released in the U.S. included both the original Japanese and English instructions.  Still don't get why you'd need both.


A front shot of both Gundams.  Typically, parts from both kits were snipped off their runners and the resulting nubs were left unattended.  The included stickers were applied and the rest was colored carefully with canvas paint.  Dark patches were added to Sandrock's legs, no doubt to mimic the shading in the photos on the instructions.


A rear view of the Gundams.  Heavyarms comes complete with all its accessories, including open/closed missile bays and pairs of closed-fist, trigger-finger, and open-palm polycap hands; a refreshing step-up from the original 1/144-scale models.  Sandrock also has polycap hands and 2 plastic hands grasping the hilts of its heat shotels, a variant chest for crotching poses, a shield to combine the shotels for the "Cross Crusher" attack, and a single hilt for the shotels.


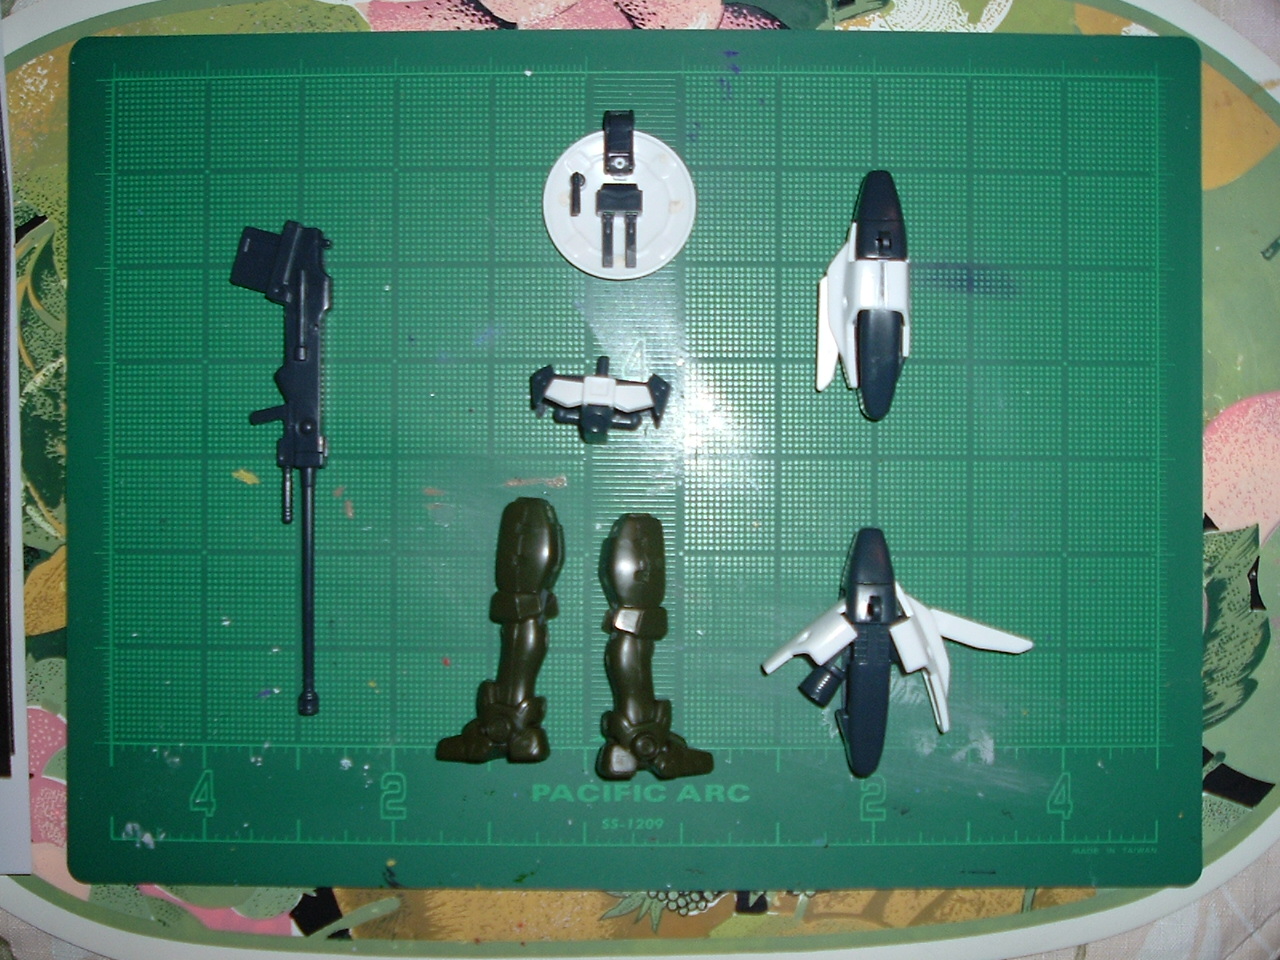
As shown here, I've separated each and every part of both kits and given each (and all the polycaps) their own container.  I then filled said containers with rubbing alcohol and let the parts soak for a day so as to loosen the paint.  Sure enough, the paint just peeled off of Sandrock's parts.  But the paint on Heavyarms proved harder to remove, even after having to leave it for a week.  Then I dunked Heavyarms in Windex, but I'm gonna need something stronger to remove the darker paint.  Unfortunately, the acetone in the nail polish remover I tried just melted the talons off the another model from the bundle.

Another hurdle is that both heads have been glued together.  I managed to yank off half of Sandrock's head, but everything else's stuck on the other half.  Once again I'll have to wait till next weekend to try and sort it all out.  Until then, I've really gotta plan things better.

Sunday, July 22, 2012

Guess What! (8)

Realizing that my online purchases have gone up while my funds have gone down over the past few months, I've made it a goal to save as much money as possible.  But just the other day, I walked past this guy's daily garage sale, seeing nothing in particular--except this:


It wasn't until today that I was able to make a little withdraw and get this for just $5.  I checked the box beforehand expecting just a built 1/144 High Grade Heavyarms Custom or a semi-complete kit with missing parts and runners, but instead . . .


I get a complete Heavyarms, a No Grade Epyon of the same scale, a Vayate, a Sandrock Custom, . . .


Assorted parts and weapons (and runner scraps) from all the kits, . . .


And instructions for Heavyarms in Japanese and English (Like anyone really needed both).


The previous owner went over Epyon and Heavyarms with stickers and canvas paint, of all things, but failed to follow through with Vayate and Sandrock.  Plus I could see all the spots where the parts were snipped off the runners.  I definitely see myself restoring all these models except Epyon, which is a loose, disproportionate mess I'll likely harvest for spare parts.  And it just so happens that I wanted spare parts for my Leo IV.  This marks the end of the latest edition of Guess What!.  Until next time, I'm still digesting the Chinese-style fried chicken I had for lunch.

Tuesday, May 22, 2012

WIP: 1/144 NG Leo Type IV Custom (Part 3)

After noticing the high reception to previous posts on the subject, I've decided to scrap my MAC Forums project and continue my 1/144 Leo/Tallgeese kitbash.  In retrospect I regret some of the choices I've made in creating my Leo Type IV, like gluing together the shoulder armor before adding the tiny sidearms for the weapons.  But since my last blog on the subject, I've had more than enough time to think of how to build the model without causing further mishaps.  Here's what I've got so far:


I started by building the remaining parts to see how they fit.


Next, after binding Leo's torso with rubber bands, I sanded the sides and then drilled into the torso from under the waist to fit Tallgeese's abdomen.  If you look closely, you'll see the drill wasn't exactly centered.  But then, the drill itself was smaller than the hole for the polycap.


But then I took apart the torso and cut and sanded the channels inside in order to widen the now deepened hole.  Because the lower torso is hollow on the inside, Leo can do a full 360 at the waist with no problems, at least until I attach Tallgeese's rear skirt armor.


On a related topic,  I've finally sanded off the eagle outline on Tallgeese's shield.  Now for the completed product.


Front View


Rear View


Rear View with Twin Verniers Raised


The last time I worked on this, I thought the torso was too long and would cause proportion problems.  But the completed model looks better than I expected.  Having already drilled a hole in Leo's head to squeeze in Tallgeese's headcrest, I'm thinking of filling the hole and just gluing the crest on instead.  The arms need cleaning up, but I've cut channels in the sidearms and they clipped onto the shoulders just fine.  So did the twin verniers at the back, though their parts fit in so tight they barely open to reveal the thrusters.  By comparison the legs don't fully snap together, and I still have to modify them to fit Tallgeese's side skirt armor.  And I've also got to remove the seams on the feet and elsewhere.  Cleaning up the weapons shouldn't be too hard.  You'll notice that I've kept the rubber bands on the torso, cuz both halves tend to split apart.  I'll also need more supplies for the modifications I have in mind.  So things will get pretty busy until the next post.  Until then, it's great to be back in the saddle!

Sunday, April 29, 2012

Guess What I Got Today! (7)

With the MAC Forums project put on hold and with nothing better to do, here's the newest Gunpla I've bought a week ago:


This is the 1/144 NG Victory Gundam Weapons Set, from the Weapons for Mobile-Suit series of add-ons.  Priced at just $10 and with a bunch being sold on eBay, I figured this would make a great addition to my V Gundam models.  The front of the box shows everything the set has to offer: 2 standard beam rifles, 2 beam bazookas, a "multi-bazooka", a gattling gun, 2 beam guns, 2 beam cannons, a beam pistol with a multi-launcher attachment, extra polycap hands, a set of what appears to be water-slide decals, and a head variant for the 1/144 Victory 2 Gundam.


Looking the left and right sides of the box, we see that the Weapons Set is No.14 in the 1/144 V Gundam series (?) and originally sold for 500 Japanese yen.


The top of the box shows 3 Gunpla with the added weapons and decals.


The bottom shows everything painted.


Out the box, the weapons and markings are packaged separately from the six pairs of hands.  The illustrated sheet at the center shows what goes with which model (along with instructions on the back) while the sheet on the left shows on which models you apply the decals, which are actually stickers.  I'll have to see about getting those made into decals.

That's it for my latest Guess What.  We'll see what else happens in the next few days.  Until next time, it's opening week for The Avengers and I haven't watched any Marvel movies leading to it.

Friday, April 27, 2012

Review: 1/144 NG G Gundam

Before I finally begin my review on God Gundam, here's all the WIP blogs leading to it:

Part 1

Part 2

Part 3

Part 4

Part 5


General/Technical Data

Series: No Grade 1/144
Title: GF13-017NJII God Gundam
Release Date: 12/1994
Suggested Price: ¥500 ($7)
No. of Parts: 59 + Polycaps + Foil Stickers
Plastic Colors: Red, White, Blue, Yellow
Gimmicks: Core Lander, Beam Sword, "God Finger" Hand

Intro

My quest to collect every God Gundam kit of every grade of quality began with me getting the lower-grade models outta the way.  This one's simple enough to build and it can pull off some decent poses once complete.  But as with all NG's, a bit of painting makes a big difference in the overall look.

Head


The head consists of the back, the face, the forehead and the double V-fin; supported by a polycap ball joint in the torso.  Very small but also very detailed.  Stickers are available for the eyes.

Torso


The chest has 2 pegs for the arms, a hole in the back for the Core Lander jet, and a peg at the bottom to attach to the lower body.  Held together by a special polycap piece, the torso barely holds together, especially since the front and side skirt armor are molded as separate parts.  Stickers are included for the front skirt armor.

Arms


Each arm has 6 points of articulation, if you count the ball-jointed polycap hands, the spikes on the forearm guards and the armor parts that sandwich the shoulders.  The spikes also have tiny holes on one side that don't really ruin the look if you position them with said holes facing each other.  The forearms also bare 2 pegs to extend and retract the guards for God Gundam's Hyper Mode.


Legs


Once fixed to the torso, each leg bears 4 points of articulation, including the double-jointed knees typical of 1/144 scale NG's.  One drawback is that the ball joints of the feet aren't stiff enough to fully support the rest of the body.  Stickers are available for the knees.

Weapons & Accessories


The most color-accurate accessory to the kit, G Gundam's Core Lander jet (Left) tranforms to attach to the Gundam's back, and only its canopy and thrusters need to be painted.  The thrusters also have holes on the side.  The jet's 6 fins all separate for G Gundam's Hyper Mode.  The Gundam's single beam sword (Center) and God Finger hand (Right) are molded in single yellow parts so painting is recommended.  The God Finger also has a gaping hole in the palm, which can be filled in with putty.

Conclusion

The only major flaw I really see in this kit is the flimsy lower torso.  With just that special polycap wedged between the 2 main parts for the lower body, it can easily fall apart and I'd rather have a sturdy torso with limited articulation than separate skirt armor.  Other than that, the 1/144 NG G Gundam is a well-made, cheap alternative to the more advanced Gunpla hobbyists enjoy now.  Hopefully it's High Grade counterpart will prove to be one such kit.


Overall Rating: 3.0 Out of 5 Stars.

Thursday, April 19, 2012

Guess What I Got Today (6)

Let's be honest; the only reason anybody buys a Japanese hobby magazine that's scanned on Gundam Guy a month in advance is to get their hands on the freebie that's eventually sold separately on eBay, where I happened to come across my latest purchase.


This is the 1/144 NG (?) Sword Calamity Custom Kit.  Originally included with the October 2004 issue of Hobby Japan magazine, it's a conversion kit for the 1/144 HG Calamity Gundam from Gundam SEED.  I've debated buying this for weeks because of the price, which was quite steep for a single runner (and a DVD).  But having to pass up better deals as I scraped and saved for my trip out of town, and planning for two SEED projects down the road, I couldn't bring myself to turn this down.


After ranking my brain over the packaging, we find an instructional DVD I've already seen on YouTube several times.


And then we find the actual runner of parts under the cardboard flap.


Here's a front view of the runner which includes variant shoulder/shin/holster parts; two "Schwert Gewehr" anti-ship swords (with beams molded on); two "Midas Messer" beam boomerangs (with no beams); two pincer-like "Panzer Eisen" rocket anchors (which don't clamp on or off); and two "Armor Schneider" combat knives (which would be holstered in the shins if not for the knives already molded on the shins).


Here's a rear view of the runner.  If you watch closely, not only will you see that the plastic bag's been torn open, but a piece of the runner's been snipped off.  I guess the previous owner had as much trouble parting with this kit as I had buying it.  But since all the actual parts are intact, it's of no consequence.

That's it for the latest addition to my Gunpla backlog.  Join me next time when I add even more to said backlog along with the long-awaited review of the 1/144 NG God Gundam.  Until then, I'm gonna pop in my first Region 2 DVD (for a refresher course).

Sunday, March 25, 2012

WIP: 1/144 NG G Gundam (Part 5)


In less than a week, I've finally completed the 1/144th scale No Grade God Gundam.  Besides the painting, the hard part was waiting for everything to dry.  But because I often didn't add thinner to the paint used, the finished surface didn't smooth out as neatly as I wanted, thus having to work on the same parts multiple times.  Another gripe is that I tried to shade the shiny yellow God Finger with runny orange paint and wound up with a muddy finish.  But that didn't annoy me nearly as much as when I finally attached the spikes to the forearm guards, which I almost couldn't do after over-priming the spikes weeks earlier.  Nonetheless, the kit is complete and I moved on to my favorite part of the process.  So without further ado . . .

LET'S GO GUNDAM FORCE!


Form feet and legs!


Form arms and torso!


I'll form the HEAD!


If wooden swords work for other anime shows, it can work for Gundam.


All things considered, I've learned a lot from building this kit, and you can't argue with the results (especially when you're taking photos with lots of lighting and where small errors don't show).  I'll get started on my MAC Forums project as soon as I review God Gundam.  But even that will have to wait, since I'll be joining my family on a small vacation.  At least I'm leaving this for you, the viewer, before I go.  Until next time . . .


I'm posting this pic on this particular blog to see how many views it gets.

Thursday, March 15, 2012

Guess What I Got Today (5)

I know I said my next blog would show off my completed G Gundam, but I've just received a new item via FedEx with an interesting backstory behind it:


Yes, I always post my own pics but I've just been overwhelmed with chores and errands for the past 7 hours.

Anyway, rather than wait for someone to sell it online to the highest bidder, I pre-ordered my own HG Gundam SEED Custom Kit, a freebie with next month's issue of Hobby Japan magazine (which you've probably already read on Gundam Guy), from GGInfinite.  But the story begins 2 days ago, when I received an email from someone in Austin, TX telling me that he received a package that had both his invoice and mine.

Believing said package to be mine, the stranger had me confirm my order number and after 2 more messages, the package was on its way to my neck of the woods.  I was eager to compensate the stranger for his troubles, but he was satisfied that we were able to resolve this dilemma amongst ourselves (and I was thankful he didn't take up my offer).  This simple act really goes to show the courtesy and class that I know the modeling community is capable of.  As for GGInfinite, I could say it was simple mistake on their part and I'm sure they could've helped me out if I contacted them.  But I've known eBay sellers who've never screwed up that bad.  Let's leave it at that.

In closing, the stranger knows he has my thanks and I hope he enjoys his kit as much as I'll enjoy mine.  So what's so special about it?

As most Gunpla builders should know, the SEED Custom Kit has customization parts to make Bandai re-released High Grade SEED models more posable.  But it also includes a 1/144 scale 'Grand Slam' sword, which was included with the 1/60 Perfect Grade Strike Gundam and featured in the short film Gundam EVOLVE 7.  A peg on this sword's hilt also makes it compatible with Real Grade models.  This single runner seems to have enough parts to spruce up 2 kits.  But with no instructions, save for what is shown in the magazine, I'll find out what I'm dealing with when the time comes.

Join me next time when I finally present to you my completed G Gundam.  Until then, ALWAYS keep the receipt.

Friday, February 17, 2012

WIP: 1/144 NG G Gundam (Part 4)

Yet again errands and auctions combine to completely steer me away from my Gunpla.  But I took advantage of an extra day alone despite further obstacles.


I started by painting all of G Gundam's primed parts.  As you can see, I overpainted the bottom of one foot red, which I eventually corrected with thinner and white paint.


After all was said and done, I've completely erased the holes on the spikes for the shoulder guards.  I just hope that nothing gets jammed when I finally piece everything together.


I passed the time between paintjobs by inking the sculpted lines on the non-painted parts.  I started inking the skirt armor before realizing I had to color it, and then realized I had to buy more paint since my old jars dried up and the Gundam Markers clashed with the plastic colors (sigh).


But my first real accomplishment in weeks was turning G Gundam's single beam sword into a bokuto, or bokken or whatever the Japanese call their wooden swords.  I used natural wood as a base color and then drybrushed a mix of flat and light brown for a wood-grain effect.  Afterwards I drybrushed on some rubber (yes, rubber) for darker grains before going over the whole thing with clear yellow.  Looking back, I never thought of studying my own wooden floor for this.

From here on in, you'll hear nothing more from me till this thing's done.  So until then, I'll continue analyzing the fascination of young girls with the Twilight Saga.